Project Creator’s Guide
Before You Start
This is a long document. It’s long because it has to be, not because we want it to be. If you follow it, everything will be fine.
It is important that you perform all of the steps, in the order they are given here. Don’t skip any steps. Don’t try to do things in parallel. Don’t jump around.
If your project is already set up in the OpenDev infrastructure, you might want to see Zuul Best Practices for information on adding new tests to a repository.
Decide Status and Namespace of your Project
OpenDev is used by different projects which often use different namespaces. Some of these namespaces have special policies.
If your project does not fit into one of the existing namespaces, you may create a new one.
For OpenStack and thus the openstack namespace, the policies are:
Official OpenStack projects are those that have applied for this status with the technical committee. The governance site contains details on how to become one and the list of current OpenStack Project Teams. The Project Team Guide explains how OpenStack project teams work.
If you add a new repository, you can make it part of an existing official OpenStack project, use it to start a new official project, or start as a related project (formerly known as StackForge).
Note that only official OpenStack projects may use certain parts of the OpenStack infrastructure, especially the docs.openstack.org and specs.openstack.org server.
Choosing a Good Name for Your Project
It is important to choose a descriptive name that does not conflict with other projects. There are several places you’ll need to look to ensure uniqueness and suitability of the name.
Note
If you encounter any issues establishing a valid unique name across all of the tools we use, consult with the Release Manager before going any further.
Character Set
We prefer to use names made up of lower case ASCII letters and the
- punctuation symbol to avoid issues with various installation
tools.
git repository
The base name of the repository should be unique across all of the
namespace directories for git repositories under
https://opendev.org/explore/repos. That is, it is not sufficient to have
openstack/foo and openstack-dev/foo because that prevents us
from moving those two repositories into the same namespace at some
point.
PyPI
Python packages need to have a unique name on the Python Package Index (https://pypi.org) so we can publish source distributions to be installed via pip.
It is best to name the repository and the top level Python package the same when possible so that the name used to install the dist and the name used to import the package in source files match. Try “python-” as a prefix if necessary (for example, “python-stevedore”).
Project Team Rules
Some hosted project teams have naming conventions that must be followed. For example, the OpenStack Oslo team has instructions for choosing a name for new Oslo libraries.
Give OpenDev Permission to Publish Releases
New Python projects without any releases do not need to be manually registered on PyPI. The first upload for a nonexistent project will automatically register it and add the uploader’s account as the initial owner.
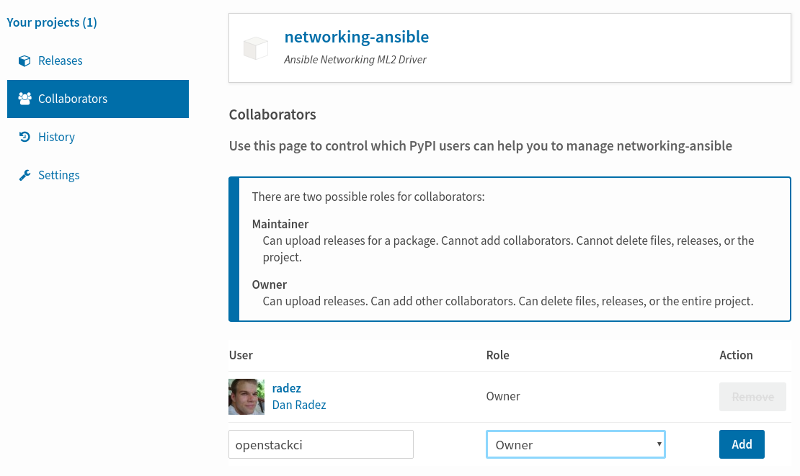
If your project already exists on PyPI, update the roles for it so
the “openstackci” user has “Maintainer” permissions. Visit
https://pypi.org/manage/project/<projectname>/collaboration/
and add “openstackci” in the “User Name” field, set the role to
“Maintainer”, and click “Add Role”.
Give OpenDev Exclusive Permission to Publish Releases
In some cases, such as OpenStack governed projects, maintainers may want to give exclusive access to the package to the “openstackci” user. This ensures releases are always created by automation and not by humans.
Update the roles for your project so the “openstackci” user has “Owner”
permissions. Visit
https://pypi.org/manage/project/<projectname>/collaboration/
and add “openstackci” in the “User Name” field, set the role to
“Owner”, and click “Add Role”.
After ensuring the “openstackci” user has owner access, you should also consider removing any remaining users, including your own, from the project. This will prevent accidental releases from being made and prevents compromise of the project if a your user account is compromised. You do this by clicking the remove button beside your username in the list.
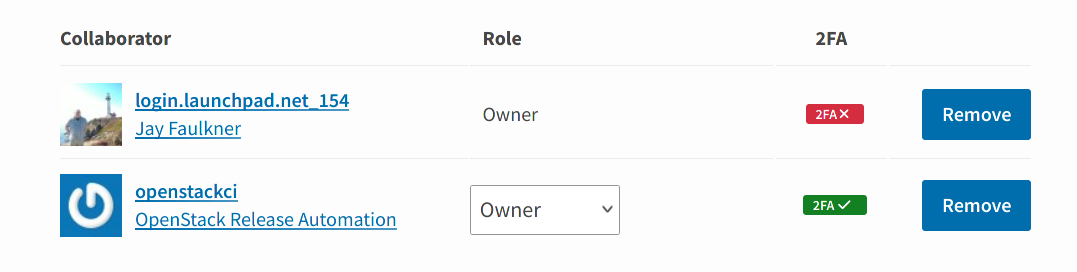
If you are unable to remove your user after following these steps, please ensure you have configured the “openstackci” user to have “Owner” permissions, as mentioned above. PyPI will not permit you to remove yourself as an owner if there are no other owners configured for the package.
Adding the Project to the CI System
To add a project to the CI System, you need to modify some infrastructure configuration files using git and the OpenDev gerrit review server.
Note that you need two changes to set up your new project for testing with OpenDev CI systems.
First change to create the git repository, configure ACLs, and add the git repository to the OpenDev CI system, see Add the project to the master projects list and following sections.
For official OpenStack projects, this change should also link via
Needed-Byto a change for theopenstack/governancerepository to add the new repository under the project team, see Add New Repository to the Governance Repository.This change is for
openstack/project-configrepository.Second change to add jobs to your project, see Add Jobs for your Project. This one can only pass Zuul internal testing once the first change is merged, the repository gets created and Zuul reloads its configuration.
Add the project to the master projects list
Edit
gerrit/projects.yamlto add a new section like:- project: <namespace>/<projectname> description: Latest and greatest cloud stuff. use-storyboard: true
The
use-storyboard: trueis added so that repos will be automatically created as projects in StoryBoard (community tool for managing work being done in your project and tracking tasks).Provide a very brief description of the project.
If you have an existing repository that you want to import (for example, when bringing a repository into gerrit from github), set the “upstream” field to the URL of the publicly reachable repository and also read the information in Configure git review:
- project: <namespace>/<projectname> description: Latest and greatest cloud stuff. upstream: https://github.com/awesumsauce/<projectname>.git
Warning
When import a project from an upstream, it’s important that you ensure no Zuul configuration is included in the repository. The import process will also import all of the branches and tags, deletion of branches afterwards is a manual task, so must be avoided; imported tags cannot be deleted due to the distributed nature of Git.
Note
If you do not configure the upstream source here and get the project imported at project creation time you will have to push existing history into Gerrit and “review” then approve it or push some squashed set of history and “review” then approve that. If you need to preserve history the best option is to configure the upstream properly for Gerrit project creation. If you have a lot of history to import, please use the upstream field instead of creating a repository and then pushing the patches one at a time. Pushing a large number of related patches all at one time causes the CI infrastructure to slow down, which impacts work on all of the other projects using it.
Note
The groups list is used by Storyboard to be able to present grouped views of projects, stories, and tasks across multiple related repositories.
Example:
- project: <namespace>/<projectname> description: Latest and greatest cloud stuff. use-storyboard: true upstream: https://github.com/awesumsauce/<projectname>.git groups: - oslo
Viewing & Using Your Project’s Task Tracker
After the project-config change above has merged, all repositories will be created in Storyboard and you will be able to interact with them- filing bugs and adding requests for new features in the webclient. All repositories will be added to the group that was associated with the repositories in the project-config change.
Add Gerrit permissions
Each project should have a gerrit group “<projectname>-core”, containing the normal core group, with permission to +2 changes.
For official OpenStack projects, release management is handled by the Release
Management team through the openstack/releases repository, the
default settings allow the “Release Managers” team to push tags
and create branches.
For all other projects, a second “<projectname>-release” team should be created and populated with a small group of the primary maintainers with permission to push tags to trigger releases.
Create a gerrit/acls/openstack/<projectname>.config as
explained in the following sections.
Note
If the git repository you are creating is using the same gerrit permissions - including core groups - as another repository, do not copy the configuration file, instead reference it.
To do this make an additional change to the
gerrit/projects.yaml file as shown here:
- project: <namespace>/<projectname>
  description: Latest and greatest cloud stuff.
  acl-config: /home/gerrit2/acls/openstack/other-project.config
Minimal ACL file
The minimal ACL file allows working only on master and requires a change-ID for each change:
[access "refs/heads/*"]
abandon = group <projectname>-core
label-Code-Review = -2..+2 group <projectname>-core
label-Workflow = -1..+1 group <projectname>-core

[receive]
requireChangeId = true

[submit]
mergeContent = true
Require Signing Off for DCO
If your project requires a Signed-off-by trailer in commit
messages for the Developer Certificate of Origin, change the
receive section to:
[receive]
requireChangeId = true
requireSignedOffBy = true
Note that this is mandatory for all official OpenStack deliverables and should also be set for projects that want to become official deliverables.
Creation of Branches
For projects not handled by the Openstack release team, to allow
creation of branches to the project release
team, add a create rule to it the refs/heads/* section:
[access "refs/heads/*"]
abandon = group <projectname>-core
create = group <projectname>-release
label-Code-Review = -2..+2 group <projectname>-core
label-Workflow = -1..+1 group <projectname>-core
Deletion of Branches
Members of a team that can create branches do not have access to delete branches. Instead, someone on the OpenDev team with gerrit administrator privileges will need to complete this request.
Stable Maintenance Team
If your team has a separate team to review stable branches, add a
refs/heads/stable/* section:
[access "refs/heads/stable/*"]
abandon = group Change Owner
abandon = group Project Bootstrappers
abandon = group <projectname>-stable-maint
exclusiveGroupPermissions = abandon label-Code-Review label-Workflow
label-Code-Review = -2..+2 group Project Bootstrappers
label-Code-Review = -2..+2 group <project-name>-stable-maint
label-Code-Review = -1..+1 group Registered Users
label-Workflow = -1..+0 group Change Owner
label-Workflow = -1..+1 group Project Bootstrappers
label-Workflow = -1..+1 group <project-name>-stable-maint
The exclusiveGroupPermissions avoids the inheritance from
refs/heads/* and the default setup. The other lines grant the
privileges to the stable team and add back the default privileges for
owners of a change, gerrit administrators, and all users.
Voting Third-Party CI
To allow some third-party CI systems to vote Verify +1 or -1 on
proposed changes for your project, add a label-Verified rule to
the refs/heads/* section:
[access "refs/heads/*"]
abandon = group <projectname>-core
label-Code-Review = -2..+2 group <projectname>-core
label-Verified = -1..+1 group <projectname>-ci
label-Workflow = -1..+1 group <projectname>-core
Optionally, if you only want them to be able to Verify +1 you can
adjust the vote range to 0..+1 instead.
Once the project is created it is strongly recommended you go to the
General settings for the <projectname>-ci group in Gerrit’s
WebUI and switch the Owners field to your <projectname>-core
group (or <projectname>-release if you have one) so that it is
no longer self-managed, allowing your project team to control the
membership without needing to be members of the group themselves.
Extended ACL File
So, if your project requires the DCO and allows voting
third-party CI systems, create a
gerrit/acls/<namespace>/<projectname>.config like:
[access "refs/heads/*"]
abandon = group <projectname>-core
label-Code-Review = -2..+2 group <projectname>-core
label-Verified = -1..+1 group <projectname>-ci
label-Workflow = -1..+1 group <projectname>-core
[receive]
requireChangeId = true
requireSignedOffBy = true
[submit]
mergeContent = true
If your project does not require the DCO, has a release
team that will create tags and branches, and allow voting third-party
CI systems, create a gerrit/acls/<namespace>/<projectname>.config
like:
[access "refs/heads/*"]
abandon = group <projectname>-core
create = group <projectname>-release
label-Code-Review = -2..+2 group <projectname>-core
label-Verified = -1..+1 group <projectname>-ci
label-Workflow = -1..+1 group <projectname>-core
[access "refs/tags/*"]
createSignedTag = group <projectname>-release
[receive]
requireChangeId = true
[submit]
mergeContent = true
See other files in the same directory for further examples.
Create an IRC Channel for Realtime Collaboration
This step is not required, but if you’re considering adding a new IRC channel, see the IRC services documentation.
Configure GerritBot to Announce Changes
If you want changes proposed and merged to your project to be
announced on IRC, edit gerritbot/channels.yaml to add your new
project to the list of projects. For example, to announce
changes related to an OpenStack Oslo library in the #openstack-oslo
channel, add it to the openstack-oslo section:
openstack-oslo:
  events:
    - patchset-created
  projects:
    - openstack/cliff
    - openstack/cookiecutter
    - openstack/hacking
    - openstack/oslo-cookiecutter
    - openstack/oslo-incubator
    - openstack/oslo-specs
    - openstack/oslo.config
    - openstack/oslo.messaging
    - openstack/oslo.rootwrap
    - openstack/oslo.test
    - openstack/oslo.version
    - openstack/oslo.vmware
    - openstack/oslosphinx
    - openstack/pbr
    - openstack/stevedore
    - openstack/taskflow
  branches:
    - master
Add Project to Zuul
Test jobs are run by Zuul. For information on how to configure your repositories to run Zuul jobs you can refer to the Zuul documentation.
Edit zuul/main.yaml and add your project in alphabetical order to the
untrusted-projects section in the openstack tenant after the
comment that reads:
# After this point, sorting projects alphabetically will help
# merge conflicts
Submitting Infra Change for Review
At this point, you should submit all the additions discussed so far as a single change to gerrit.
When submitting the change to openstack/project-config for
review, use the “new-project” topic so it receives the appropriate
attention:
$ git review -t new-project
Hold onto the Change-Id for this patch. You will need to include it in the commit message when you Add New Repository to the Governance Repository later.
Add Jobs for your Project
Every project needs at least one test job in the gate queue or patches will not be able to land.
You can add jobs in either your new project’s .zuul.yaml file or
in file the zuul.d/projects.yaml in the central repository
openstack/project-config. This must be a separate change from the
one you created earlier to add your entry in zuul/main.yaml, since
these additions will fail with Zuul syntax errors until that merges.
Official OpenStack projects should implement the OpenStack wide jobs mentioned in the Project Testing Interface (PTI) document. For more information on adding additional jobs into your project, see Adding In-Repo Zuul Jobs.
For adding jobs to your project’s .zuul.yaml file, your very first
change to merge after the repository is created or imported needs to
add this file and add jobs for both check and gate pipelines. The file
should not pre-exist in the imported repository. A minimal file that
runs no tests includes only the noop-jobs template:
- project:
    templates:
      - noop-jobs
In the past we asked that official OpenStack projects manage the PTI job config in the central projects.yaml file. This incurs review overhead that Zuul v3 was specifically designed to push onto projects themselves. In an effort to take advantage of this functionality we now ask that projects manage the PTI job config in repo.
Central Config Exceptions
There are several notable exceptions for job configs that should remain
in the central config repository openstack/project-config:
Translation jobs for all branches, note that only OpenStack official projects are translated.
Jobs that should only run against the master branch of the project they are applied to.
Examples for templates that include jobs that run only against the master branch are
api-ref-jobsand various periodic jobs likeperiodic-jobs-with-oslo-master.Jobs that are not “branch aware”. Typically these are jobs that are triggered by tag based events.
As an example, the project-templates
publish-to-pypi- and its variants -,release-openstack-server,publish-xstatic-to-pypi,nodejs4-publish-to-npm,puppet-release-jobs,docs-on-readthedocsinclude jobs that are not “branch aware” since they are triggered by tag based events.The queue configuration for the
integratedqueue needs to stay in the central config repository.
Add New Repository to the Governance Repository
If your project is not intended to be an official OpenStack project, you may skip this step.
Each repository managed by an official OpenStack project team needs
to be listed in reference/projects.yaml in the
openstack/governance repository to indicate who owns the
repository so we know where ATCs voting rights extend.
Find the appropriate section in reference/projects.yaml and add
the new repository to the list. For example, to add a new Oslo
library edit the “Oslo” section:
Oslo:
  ptl: Doug Hellmann (dhellmann)
  service: Common libraries
  mission:
    To produce a set of python libraries containing code shared by OpenStack
    projects. The APIs provided by these libraries should be high quality,
    stable, consistent, documented and generally applicable.
  url: https://wiki.openstack.org/wiki/Oslo
  projects:
    - repo: openstack/oslo-incubator
    - repo: openstack/oslo.config
    - repo: openstack/oslo.messaging
    - repo: openstack/oslo.rootwrap
    - repo: openstack/oslosphinx
    - repo: openstack/cookiecutter
    - repo: openstack/pbr
When writing the commit message for this change, make this change depend on the project creation change by including a link to its Change-ID (from the previous step):
Depends-On: <Gerrit URL of project-config change>
Then, go back to the project-config change and add a link to the Change-ID of the governance change in the project-config commit message:
Needed-By: <Gerrit URL of governance change>
so that reviewers know that the governance change has been created.
However, if you are creating an entirely new OpenStack project team
(i.e., adding a new top-level entry into
reference/projects.yaml), you should reverse the dependency
direction (the project creation change should depend on the
governance change because the TC needs to approve the new project
team application first).
Wait Here
The rest of the process needs this initial import to finish, so coordinate with the Infra team, and read ahead, but don’t do any of these other steps until the import is complete and the new repository is configured.
The OpenDev team can be contacted by pinging infra-root in the
#opendev:opendev.org Matrix room,
or via email to the service discuss
mailing list.
Update the Gerrit Group Members
After the review is approved and groups are created ask the Infra team to add you to both groups in Gerrit, and then you can add other members by going to https://review.opendev.org/#/admin/groups/ and filtering for your group’s names.
The project team lead (PTL), at least, should be added to “<projectname>-release”, and other developers who understand the release process can volunteer to be added as well.
Note
These Gerrit groups are self-managed. This means that any member of the group is able to add or remove other members. Consider this fact carefully when deciding to add others to a group, as you need to trust them all to collaborate on group management with you.
Mirroring Projects to Git Mirrors
Mirroring of git projects happens automatically to GitHub only for OpenStack projects, mirroring for all other namespaces and to other mirrors needs to be set up by the project team themselves.
To replicate your git project to a custom location, create a job that inherits from the upload-git-mirror job.
This job wraps around the upload-git-mirror Ansible role that is part of the zuul-jobs library.
In order to use this job, you must supply a secret in the following format:
- secret:
    name: <name of your secret>
    data:
      user: <ssh user of the remote git server>
      host: <address of the remote git server>
      host_key: <ssh host key of the remote git server>
      ssh_key: <private key to authenticate with the remote git server>
For GitHub, the user parameter is git, not your personal
username.
The host_key parameter can be retrieved from your known_hosts file
or with a command like ssh-keyscan -H <host> or ssh-keyscan -t rsa
<host>.
For example, the host_key when pushing to GitHub would be, on a single line:
github.com ssh-rsa AAAAB3NzaC1yc2EAAAABIwAAAQEAq2A7hRGmdnm9tUDbO9IDSwBK6TbQa+PXYPCPy6rbTrTtw7PHkccKrpp0yVhp5HdEIcKr6pLlVDBfOLX9QUsyCOV0wzfjIJNlGEYsdlLJizHhbn2mUjvSAHQqZETYP81eFzLQNnPHt4EVVUh7VfDESU84KezmD5QlWpXLmvU31/yMf+Se8xhHTvKSCZIFImWwoG6mbUoWf9nzpIoaSjB+weqqUUmpaaasXVal72J+UX2B+2RPW3RcT0eOzQgqlJL3RKrTJvdsjE3JEAvGq3lGHSZXy28G3skua2SmVi/w4yCE6gbODqnTWlg7+wC604ydGXA8VJiS5ap43JXiUFFAaQ==
The ssh_key parameter should be encrypted before being committed
to the git repository. Zuul provides a tool for easily encrypting
files such as SSH private keys and you can find more information about
it in the documentation.
For example, encrypting a key for the “recordsansible/ara” project would look like this:
$ zuul/tools/encrypt_secret.py \
  --infile /home/dmsimard/.ssh/ara_git_key \
  --strip \
  --tenant openstack https://zuul.openstack.org recordsansible/ara
You can then use the secret in a job inheriting from
upload-git-mirror as such:
- job:
    name: <project>-upload-git-mirror
    parent: upload-git-mirror
    description: Mirrors <namespace>/<project> to neworg/<project>
    vars:
      git_mirror_repository: neworg/<project>
    secrets:
      - name: git_mirror_credentials
        secret: <name of your secret>
        pass-to-parent: true
Finally, the job must be set to run in your project’s post
pipeline which is triggered every time a new commit is merged to the
repository:
- project:
    check:
      jobs:
        # [...]
    gate:
      jobs:
        # [...]
    post:
      jobs:
        - <project>-upload-git-mirror
Note that the replication would only begin after the change has merged, meaning that merging the addition of the post job would not trigger the post job itself immediately. The post job will only trigger the next time that a commit is merged.
Verify That Gerrit and the Test Jobs are Working
The next step is to verify that you can submit a change request for the project, have it pass the test jobs, approve it, and then have it merge.
Configure git review
If the new project you have added has a specified upstream you
will need to add a .gitreview file to the repository once it has
been created. This new file will allow you to use git review.
The basic process is clone your new repository, add file, push to Gerrit, review and approve:
$ git clone https://opendev.org/<namespace>/<projectname>
$ cd <projectname>
$ git checkout -b add-gitreview
$ cat > .gitreview <<EOF
[gerrit]
host=review.opendev.org
port=29418
project=<namespace>/<projectname>.git
EOF
$ git review -s
$ git add .gitreview
$ git commit -m 'Add .gitreview file'
$ git review
Verify that the Tests Pass
If you configure tests for an imported project, ensure that all
of the tests pass successfully before importing. Otherwise your
first change needs to fix all test failures. You can run most of the
tests locally using tox to verify that they pass.
Verify the Gerrit Review Permissions
When your project is added to gerrit, the groups defined in the ACLs file (see Add Gerrit permissions) are created, but they are empty by default. Someone on the infrastructure team with gerrit administrator privileges will need to add you to each group. After that point, you can add other members.
To check the membership of the groups, visit
https://review.opendev.org/#/admin/projects/openstack/<projectname>,access
– for example,
https://review.opendev.org/#/admin/projects/opendev/infra-manual,access
– and then click on the group names displayed on that page to review
their membership.
Prepare an Initial Release
Make Your Project Useful
Before going any farther, make the project do something useful.
If you are importing an existing project with features, you can go ahead.
If you are creating a brand new project, add some code and tests to provide some minimal functionality.
Provide Basic Project Documentation
Update the README.rst file to include a paragraph describing the
new project.
Update the rest of the documentation under doc/source with
information on how to contribute to the project. Add project-specific
documentation covering different content areas based on the intended audience,
such as installation, configuration, and administration. Follow the layout
of project documentation as described in Project guide setup.
Tagging an Initial Release
To verify that the release machinery works, push a signed tag to the “gerrit” remote. Use the smallest version number possible. If this is the first release, use “0.1.0”. If other releases of the project exist, choose an appropriate next version number.
Note
You must have GnuPG installed and an OpenPGP key configured for this step.
Run:
$ git tag -s -m "descriptive message" $version
$ git push gerrit $version
Wait a little while for the pypi job to run and publish the release.
If you need to check the logs, you can use the git-os-job command:
$ git os-job $version
See Tagging a Release in the Project Driver’s Guide for more detail on tag pushing workflows.
Allowing Other OpenStack Projects to Use Your Library
OpenStack projects share a common global requirements list so that all components can be installed together on the same system. If you are importing a new library project, you need to update that list to allow other projects to use your library.
Update the Global Requirements List
If you have a library that is used by OpenStack repositories,
check out the openstack/requirements git repository and modify
global-requirements.txt to:
add the new library
add any of the library’s direct dependencies that are not already listed
Setting up Gate Testing
The devstack gate jobs install all OpenStack projects from source so that the appropriate git revisions (head, or revisions in the merge queue) are tested together. To include the new library in these tests, it needs to be included in the list of projects in the devstack gate wrapper script. For the same feature to work for developers outside of the gate, the project needs to be added to the appropriate library file of devstack.
Updating devstack
Check out
openstack/devstack.Edit the appropriate project file under
libto add a variable defining where the source should go. For example, when adding a new Oslo library add it tolib/oslo:<PROJECTNAME>_DIR=$DEST/<projectname>
Edit the installation function in the same file to add commands to check out the project. For example, when adding an Oslo library, change
install_oslo()inlib/oslo.When adding the new item, consider the installation order. Dependencies installed from source need to be processed in order so that the lower-level packages are installed first (this avoids having a library installed from a package and then re-installed from source as a dependency of something else):
function install_oslo() {
  ...
  _do_install_oslo_lib "<projectname>"
  ...
}
Edit
stackrcto add the other variables needed for configuring the new library:# new-project <PROJECTNAME>_REPO=${<PROJECTNAME>_REPO:-${GIT_BASE}/openstack/<projectname>.git} <PROJECTNAME>_BRANCH=${<PROJECTNAME>_BRANCH:-master}
Add Links to Your Project Documentation
If your project is not an official OpenStack project, skip this section.
Update the https://docs.openstack.org/ site with links to your project documentation by following the instructions at Template generator details.
Zuul Best Practices
There are a couple of best practices for setting up jobs.
Jobs that run outside of a branch context (release and tag jobs are
examples), should be in your tenant’s project-config repository.
This repository should have a single branch named master removing
any ambiguity of which version of a job should run outside of a branch
contenxt.
You should also keep jobs that are expected to apply widely to a tenants’ repos here. As that helps keep coordination of changes centralized.
Adding a New Job
Jobs in Zuul are self-testing, which means that the change adding a
new job can run with that job applied into the project’s pipelines. It’s
a good idea when adding a new job in your project to put it at least
into the check pipeline so that you can verify that it runs as expected.
Use Templates
For many common cases, there are templates of jobs defined that can be applied to your project. For instance:
- project-template:
    name: openstack-python27-jobs
      check:
        - openstack-tox-pep8
        - openstack-tox-py27
      gate:
        - openstack-tox-pep8
        - openstack-tox-py27
To apply that to your project, add it to the templates section:
- project:
    name: openstack/<projectname>
    templates:
      - openstack-python27-jobs
If you use the same set of tests in several repositories, introduce a new template and use that one.
Non-Voting Jobs
A job can either be voting or non-voting. If you have a job that is voting in one repository but non-voting in another, you can indicate this by using a variant.
To make a single job non-voting everywhere, add voting: false in the
job definition.
- job:
    parent: devstack
    name: <projectname>-tempest-devstack-mongodb-full
    voting: false
and add it to your project pipelines:
- project:
    name: openstack/<projectname>
    templates:
      - openstack-python-jobs
    check:
      jobs:
        - <projectname>-tempest-devstack-mongodb-full
To use a job that is otherwise voting in your project but in a non-voting
manner, add voting: false to its entry in your project pipeline definition.
- project:
    name: openstack/<projectname>
    templates:
      - openstack-python-jobs
    check:
      jobs:
        - openstack-tox-py35:
            voting: false
Non-voting jobs should only be added to check queues. Do not add
them to the gate queue since running non-voting jobs in the gate
is just a waste of resources.
Running Jobs Only on Some Branches
If you want to run the job only on a specific stable branch, add a branch matcher to the job definition.
- job:
    parent: devstack
    name: <projectname>-tempest-devstack-mongodb-full
    voting: false
    branches: ^(?!stable/(juno|kilo)).*$
If, instead, you want to use an existing job in your project but only on a specific branch, apply it in the project pipeline definition.
- project:
    name: openstack/<projectname>
    templates:
      - openstack-python-jobs
    check:
      jobs:
        - openstack-tox-py35:
            branches: ^(?!stable/(juno|kilo)).*$
The job above will run on master but also on newer stable
branches like stable/mitaka. It will not run on the old
stable/juno and stable/kilo branches.
Project Renames
When preparing to rename a project, make changes to the files in the
openstack/project-config repository related to your project.
When uploading your change, make sure the topic is “project-rename” which can be done by submitting the review with the following git review command:
$ git review -t project-rename
Members of the infrastructure team will review your change.
Finally, add it to the Upcoming Project Renames section of the Infrastructure Team Meeting page to make sure it’s included in the next rename window.
Note
Renames have to be done during a Gerrit maintenance window scheduled by the Infrastructure team, so it may take a few weeks for your rename to be completed.
Post rename, a member of the Infrastructure team will submit a patch to update
the .gitreview file in the renamed project to point to the new project
name.
Review List for New Projects
Before approving a review for a new project creation, double check the following:
Is there existing content to import? If the team want to preserve the history, they have to use the upstream key word to import. The infra team will not push anything to your repo - and cannot hand out those permissions either.
Will this be an official project? Then it needs a governance review, with a link to it via “Needed-By”, and get PTL+1.
Will the repo release on pypi? Check that it https://pypi.org is set up correctly.
